Setting Up StreamElements Chatbot
Do you need some automated help moderating your chat? Maybe you want a little bit of help keeping the chat moving during lulls in conversation? Setting up a chatbot can be a great solution to help you manage your chat more efficiently. Let’s go through how to set up StreamElements chatbot step-by-step, so you can focus on engaging with your audience.
If you already have a streamelements account, some of this will be just a quick review.
First, log into Twitch with the account you want the bot to join.
Then, go to streamelements.com
If you already have an account, log in.
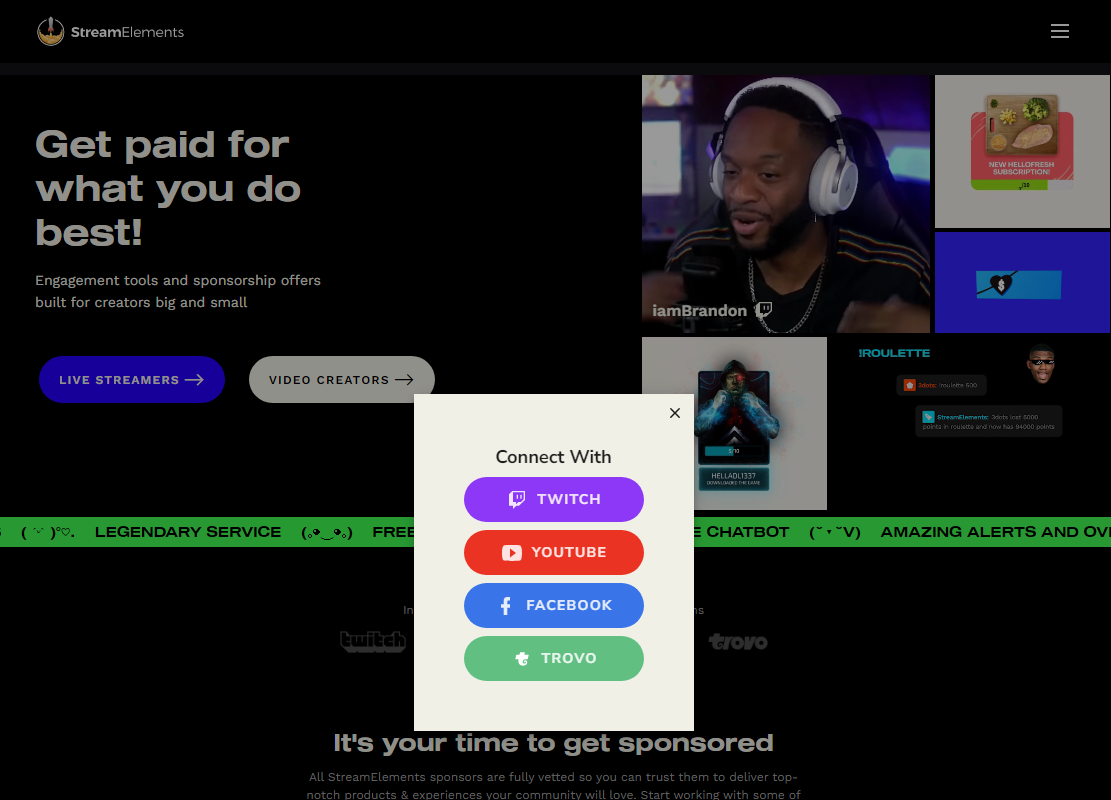
Click Get Started to make an account if you don't already have one, and click Connect with Twitch.
This video is just going to focus on using StreamElements with Twitch. However, you can use StreamElements with YouTube, Trovo, or Facebook Gaming as well.
Get StreamElements to Join Channel
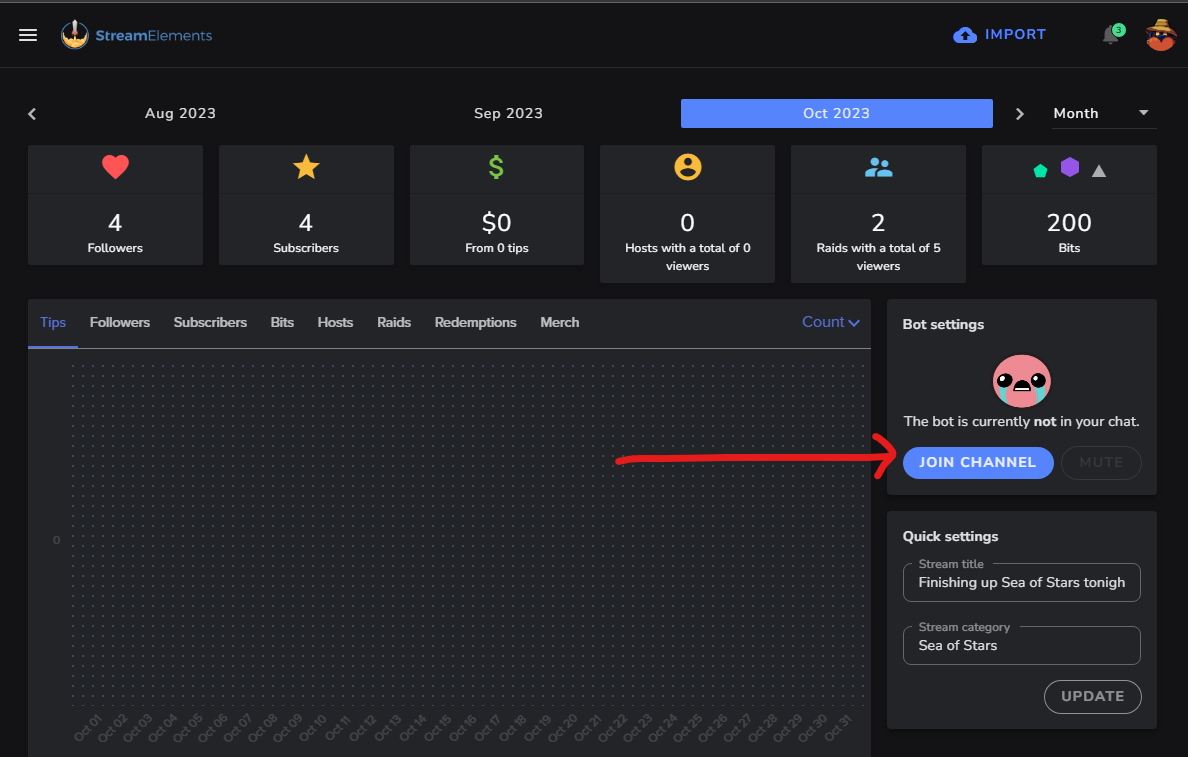
Log in and go to the Dashboard, where on the right you’ll see a box that says “Bot Settings”. If you’ve already done this part it’ll say “Part Channel” and “Mute.” If not, there will be a “Join Channel” button and you should click it.
Now go into your chat and type /mod streamelements.
You should get a message saying that StreamElements has been given mod permissions. If you have already done it, it’ll say “streamelements is already a moderator of this channel.”
Even if you think you’ve already done this, It’s worth double-checking. Enter the command again until you get that message just to eliminate this as an issue.
Congratulations, you've just completed the bare minimum steps to set up StreamElements Chatbot.
Default Commands
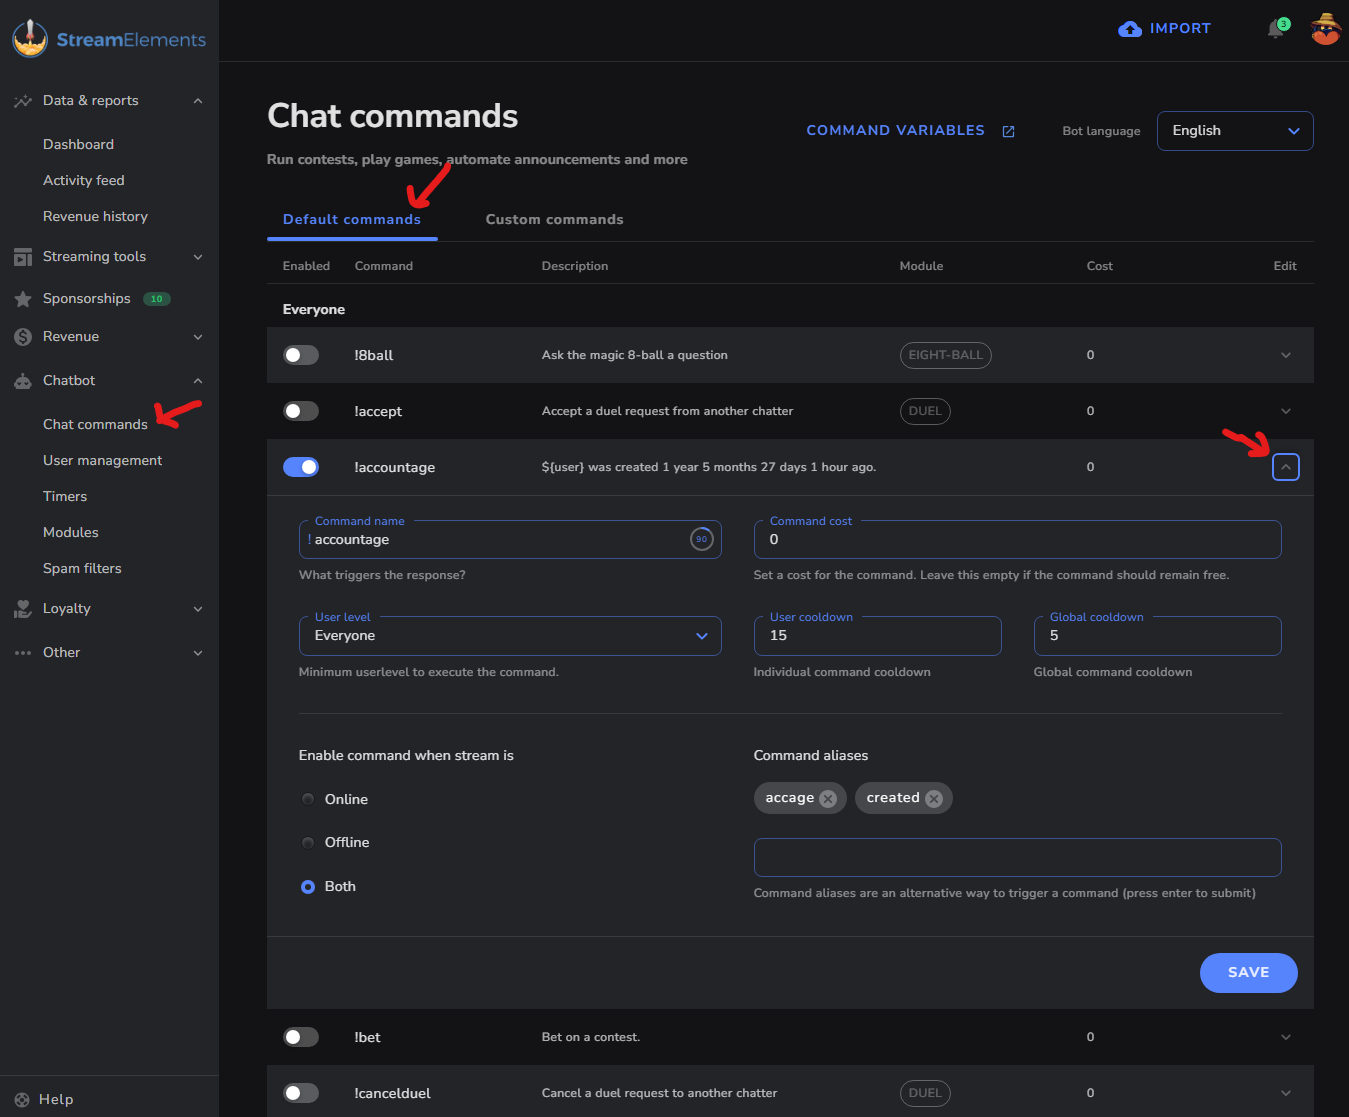
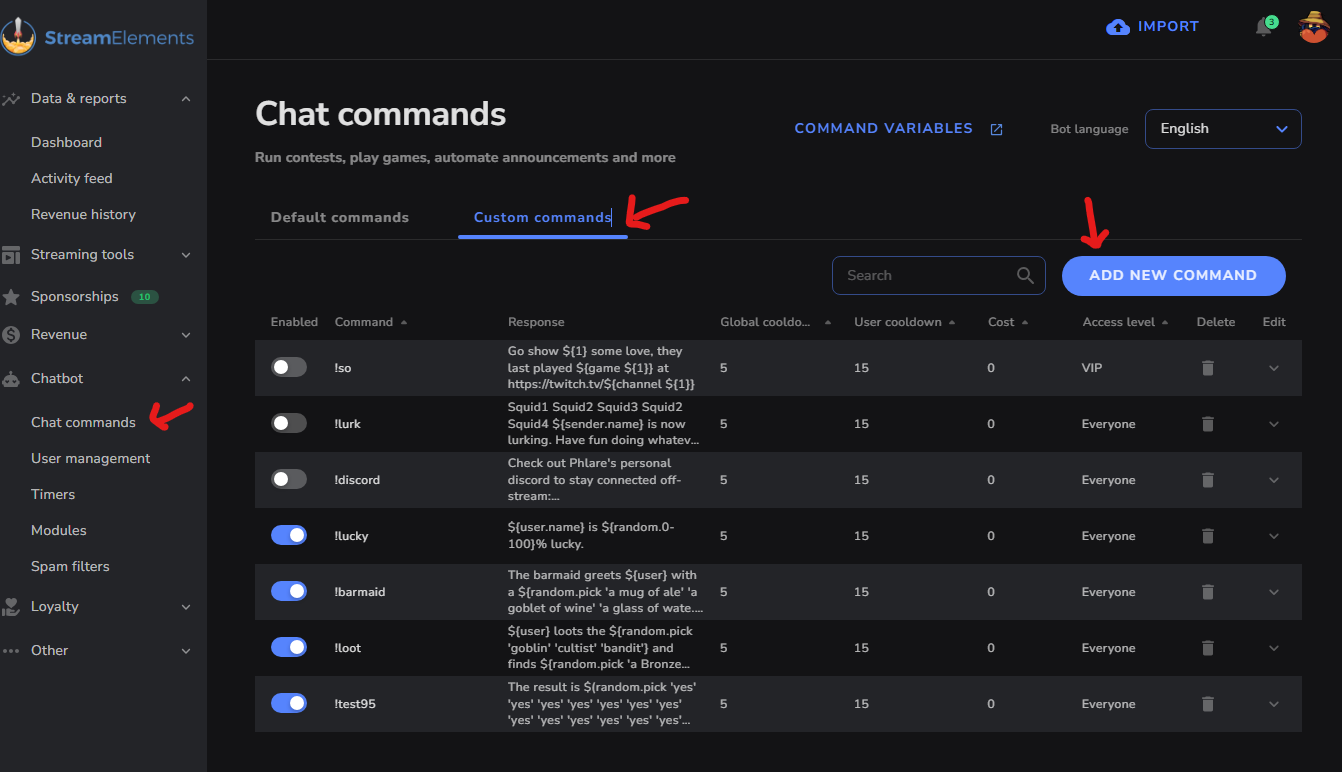
On the left, click chatbot to expand the chatbot menu and see a bunch of options. Let’s look at the “Chat commands” tab first.
Browse through the huge list of default commands. Toggle individual commands on and off with the toggle to the left. Configure any selected commands by clicking on them to expand the form.
I recommend that you browse this list and turn on any that you find useful. Just having the StreamElements Chatbot set up at all is not going to be enough, we need commands!
If this is your only chatbot, I recommend turning on some of the more basic commands. The !commands command allows users to fetch a list of commands they can use. There are !accountage, which tells the user how long since they created their account. Users can see how long they have followed your account with !followage. The !uptime command reports the amount of time your stream has been live. The !watchtime command reports the amount of time the user has been watching.
Under moderator commands, I recommend !permit if you’re going to use streamelements link protection. Under supermoderator commands, I recommend !setgame and !settitle.
Many of the other default commands are useful as well. However, these are the ones I would recommend you add right off the bat.
Configuring Default Commands
Let’s go back up to !commands and expand it so we can see the configuration options for these default commands.
In this panel, you can configure the command in a number of ways.
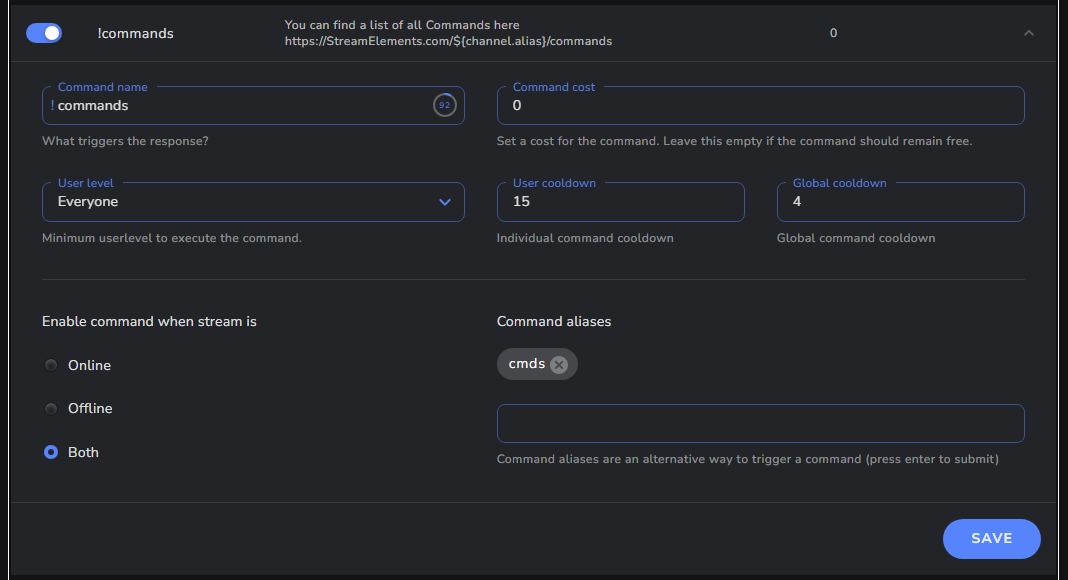
To change the keyword that users need to type for this command, use the command field. In streamelements (and most other bots), commands always start with an exclamation point.
You can set the cost if you’re using the StreamElements loyalty points system. You can set that up using the loyalty settings from the left menu.
The user level menu allows you to control who has access to each command. You can leave it open to everyone, or restricted to Subscribers, Moderators, VIPs, or just the broadcaster.
Use the user cooldown field to set the time an individual user needs to wait between uses. Use the global cooldown field to specify how long everyone needs to wait between uses.
Aliases allow you to set extra keywords that trigger this same command. For example, you might set up a shoutout command where you and your mods can use both !shoutout and !so.
You can also set each command to work only when streaming, only when offline, or both.
You’ll notice that some of these commands have something listed in the “module” column. This refers to a module that will need to be turned on for the command to work properly.
Find each module on the modules page under Chat Commands. We’ll go over a few of them later, but feel free to browse through them and read about what they do.
Custom Commands
Now let’s visit the Custom Commands Tab on the Chat Commands page. Here we’ll look at how to set up some basic custom commands.
Click the Add New Command button and we’ll go through what you can do here.
Look through the templates on the left to see some that you can use out of the box or modify to fit your needs. This is a great way to start getting familiar with building commands.
There are templates for a lot of things from checking a user’s loyalty point totals to reporting current subs or followers. There’s even a template for a command to relay Twitch support’s last tweet into chat.
I encourage you to click through each of these, even if only to take a look at what the response field looks like for each of them, and get a bit more familiarized with the variables and things that are possible with custom commands.
If you want to dig deeper into the variables that are available, there’s a link at the top of the page here labeled “command variables.”
You can really do a LOT with these commands. Check out the streamelements category to see more custom commands that you can build with StreamElements.
To explore the menu a bit further let’s make a simple custom command from scratch to share a link to something like a link tree page.
Click “Add New Command” on the top right and enter !socials in the command name field.
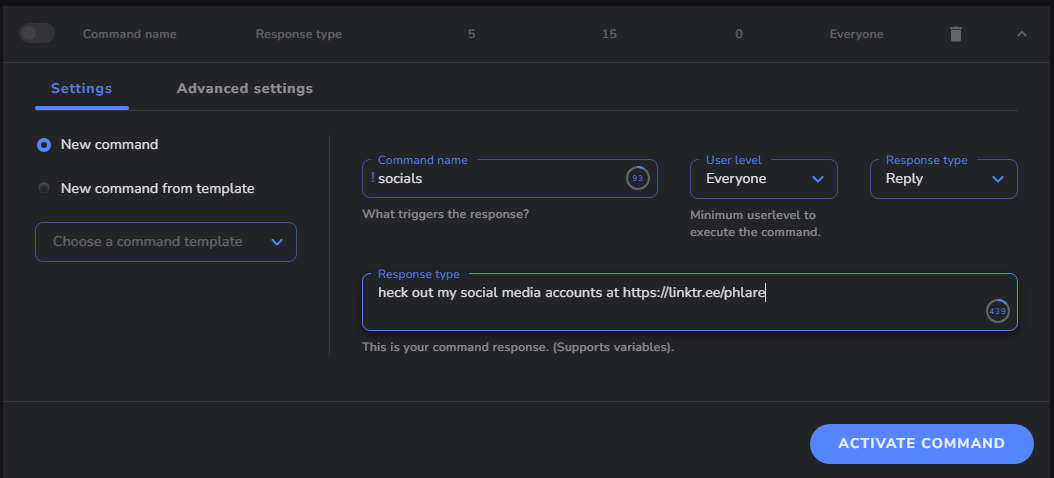
Set the User Level as desired, and then in the response field, just put something like, “Check out my social media accounts at {your link}” and then click “activate command” at the bottom.
If you go into chat now and type !socials you should see this message and link appear in chat. For more custom commands check out the StreamElements Chatbot category page for StreamElements tutorials.
User Management
If we go into the user management section you can see a list of all your mods and VIPs and other users you have established as users with special permissions.
You shouldn’t really need this area very often, so we’re not going to dig too deep for now. Let’s look at the next section for timers though.
Timed Chat Messages
You can use timed messages within StreamElements Chatbot to welcome new viewers, remind chat of upcoming events, or even promote social media channels or donation links.
To set one up click Timers in the left navigation under Chatbot and then click “Add new timer”
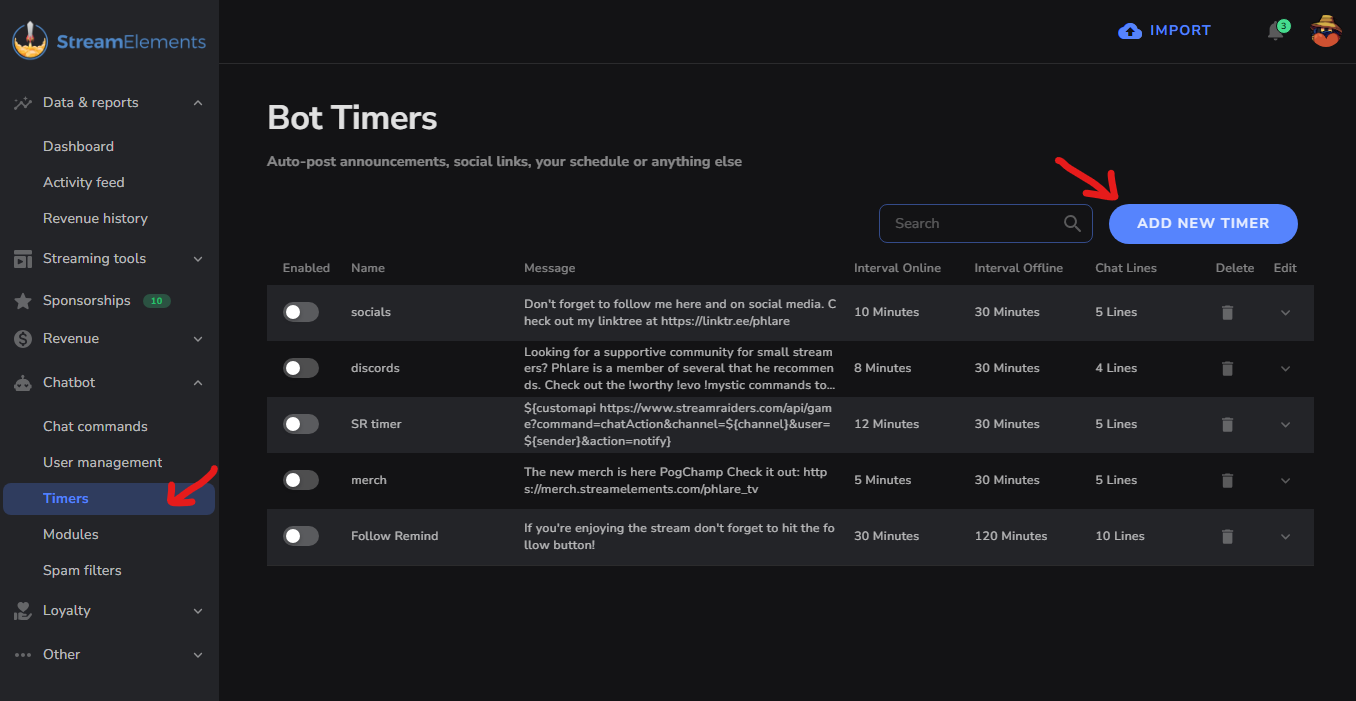
For example purposes we’ll set up a follow reminder, so in the name box we’ll put “follow remind”… the name field is just so you know what the timer is for later, users won’t see it.
The message field is where you put what you want the bot to post in chat.
For now, we’ll just put something like “If you’re enjoying the stream, don’t forget to hit the follow button!” or something like that.
You can adjust the interval on the right under the online interval. The default is 5 minutes, which is WAY too frequent for most streams.

Don't spam your own chat
Timers are great but you have to find the right settings so it’s not just the bot spamming the same thing in chat over and over.
If you have a really active chat, this isn’t as much of a problem, but in a fairly quiet chat, it can get really spammy really fast, so I recommend keeping your timer interval at something like 30 minutes, or at least 15.
Offline interval is how often this timer fires when you’re not streaming, which… I don’t see mattering that much.
You can turn it off entirely, or make it super slow.
If you have ideas on what might be fun for some offline timers and commands, let me know in the comments. I’m always curious about how people treat their offline chat.
Finally, the “chat lines” slider allows you to prevent the timer from firing even if the appropriate amount of time has passed if there hasn’t been enough other activity in chat.
This is a really good way to prevent the bot from just posting the same message again and again with nothing in between. Depending on your chat volume, I recommend setting this to at least 5, if not 10 or 20.
This means that at least 5 lines of chat from users other than the bot have happened since this timer fired last.
You may have noticed the “add message button” down here. Press this button to add additional chat messages. These will be sent out in rotation using the same interval.
If you add multiple messages here, each time the timer fires, the bot will send one of these messages to chat.
Then the next time it fires it’ll send the next message and so on and so forth until it gets to the end and loops back to the first message.
Chatbot Modules
Now let’s move into the modules that we briefly mentioned before when reviewing default commands. Click modules on the left under chatbot to open the modules page.
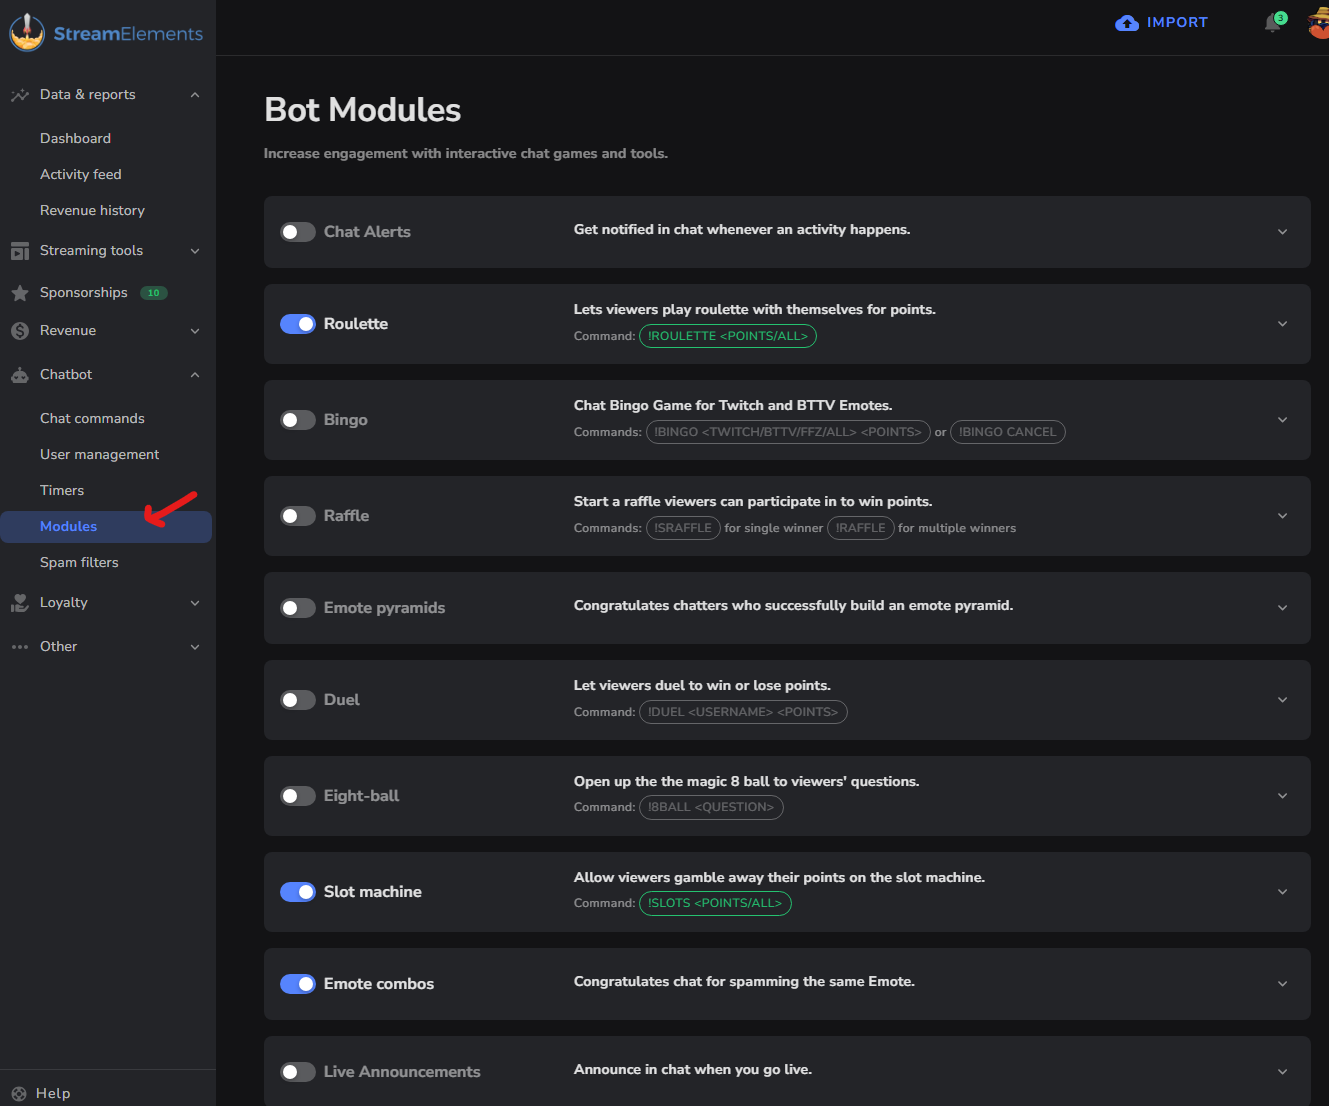
Expand any of these to display a variety of configuration options.
I encourage you to review the list of modules here yourself.
The majority of them depend on the loyalty points system and can be great fun and a good way to promote engagement in chat, but we’ll do a separate video about the loyalty system and those modules.
If this is the main bot you are using, you’re definitely going to want to turn on the Chat Alerts module.
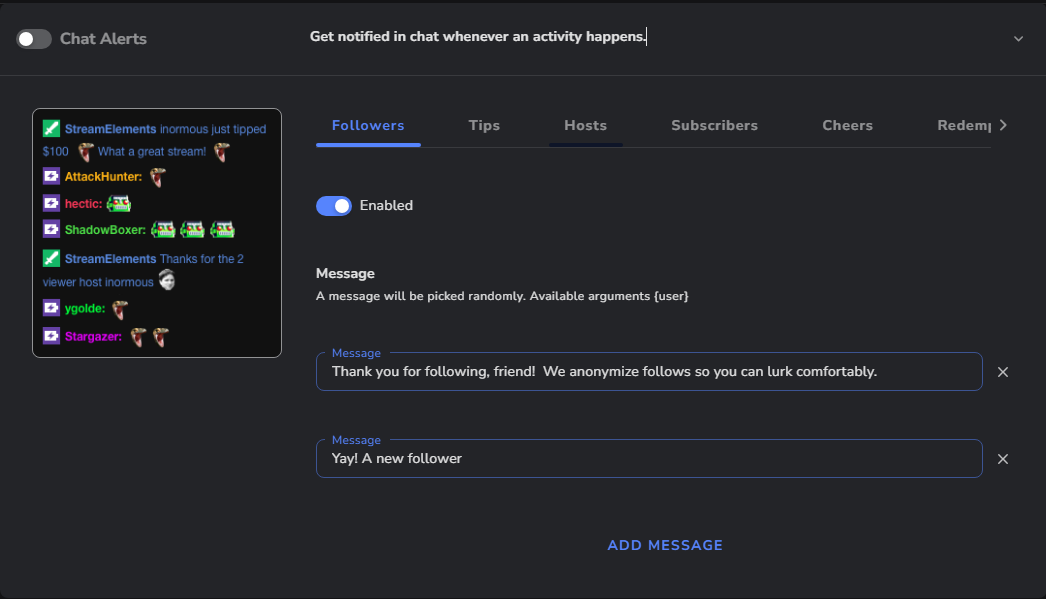
When you expand it, you’ll see a set of options for many different events, such as a new follower, tips, cheers, raids, and so on.
We’re not going to go too in-depth here because there are several options for each of these, but I encourage you to set up at least some very basic chat alerts for each type of event to thank people for their follow or sub or bittys or whatever.
These chat alerts also help YOU as a streamer keep track of these events and allow you to show appreciation appropriately on your own.
Keep in mind these are just chat-based messages. The alerts that play a sound file and show a gif, a video, or something when people sub or follow is a whole separate area of StreamElements that we’ll cover in a different video.
Spam Filters and Auto-moderation
Ok, now let’s take a look at the spam filters section of the StreamElements chatbot.
Click spam filters on the left under chatbot and you’ll see some of the auto-moderation tools available through StreamElements.
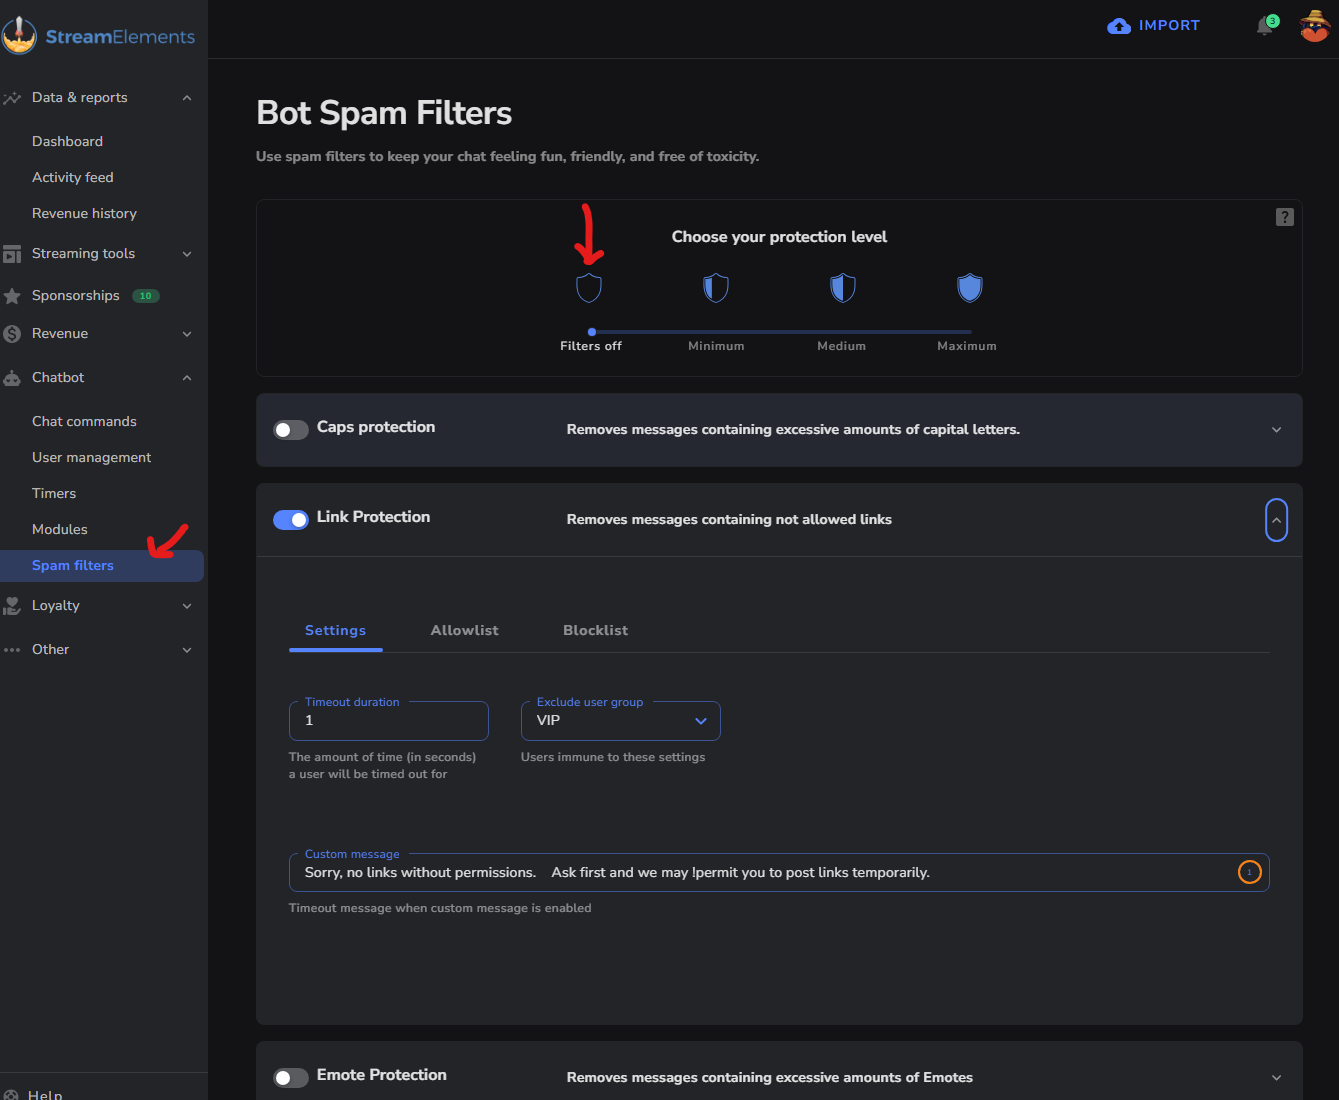
You can enable protection against capital letter spam, links in chat, emote spam, wall-of-text protection, and excessive use of symbols.
You can also set up a banned word list.
Everyone has their own preferences, but if you’re not using any other moderation tools, I would recommend at least turning on the link protection module and establishing a list of banned phrases, if you’re not already doing so with Twitch’s native tools.
Emote spam is a funny one to me because the Twitch community as a whole seems to celebrate spamming emotes and I generally enjoy it when that happens in my stream.
I personally also find that excessive caps, paragraph, and symbol protections all tend to cause more trouble than they solve but feel free to play around with them to suit your own needs. Everyone’s chat is different.
Setting up Link Protection
Under link protection, set the length that users are timed out when they violate the rule.
I usually set this really low, like 5 seconds, and set the excluded group to “No One.”
Moderators will still be able to post links, and if you enable the default command “!permit” you can allow moderators to temporarily allow people to post links upon request.
One thing to note, depending on how you have your Twitch link settings set up, links may still be blocked even if the user is given permissions with !permit.
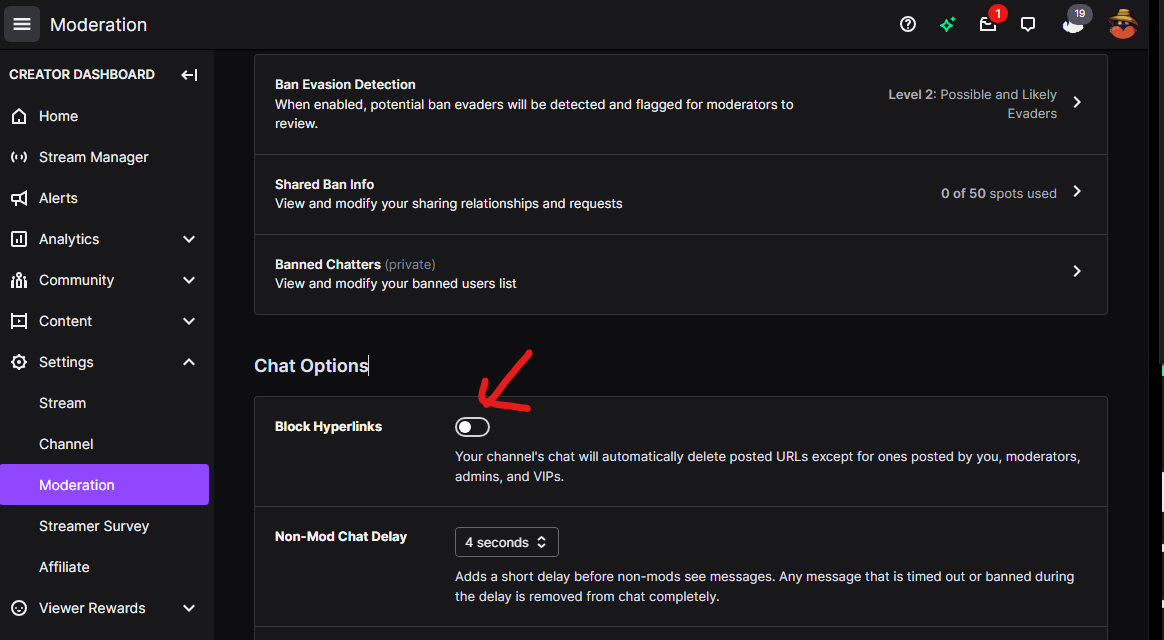
We’ll go into the native Twitch automod settings in another video, but since we’re already talking about this, let’s take a look at where this setting is in Twitch real quick.
In your Creator Dashboard, go to Settings and Moderation.
In the Second section labeled “chat options” there is a “ban hyperlinks” toggle.
If you want StreamElements to have more control of link moderation, simply leave this toggle off in Twitch.
I recommend familiarizing yourself with the rest of the Twitch auto mod settings as well, as they are getting quite comprehensive and can now do most of what people used to have to rely on bots like streamelements for.
Banned Words and Phrases
Now let’s go back into StreamElements and look at one more auto-moderation tool, the banned words list.
These days I generally just recommend doing this inside of Twitch’s Moderation settings, but streamelements provides some good options here to establish some different rules for different lists of banned phrases.
You can group your banned phrases into separate categories with varying extremes of consequences, or you can lump them all into one group.
Create a new group by clicking "create new group". Give the group a name, like “racial slurs”, “aggressive language”, or “banned words". For each group, establish how long you want the user to be timed out if they violate the rule.
You can check to scan usernames and/or chat messages for the words in each group, and can also specify what level of user can be excluded from these rules.
I don’t see any point in excluding anyone from banned words, however.
If you don’t want those words being used in your chat, why would you allow your mods to use them? Makes no sense to me.
Enter a message that will be reported in the ban reason box if you wish. Under banned phrases, start creating your list.
Click “Add new banned phrase” and then set each word you want.
If you wanna get fancy you can use regular expressions here, but we’re not gonna get into that right now.
Add as many phrases as you want until you’re satisfied. You can always come back here and adjust it later.
Click save once you’re done defining your group of banned phrases, and then make sure the group is toggled on in the top left.
You can click the “test filters” button at the top to test these now if you wish.
You can type a username or chat message you want to test and click the test button and it’ll let you know if any of your banned word groups have caught that message.
Now, we have finished setting up StreamElements Chatbot, created some simple commands for both viewers and moderators to use, some basic alerts, timed messages, moderation tools, and the know-how needed to make new custom commands.