Setting Up StreamLabs Cloudbot
Are you new to streaming or just looking for an easy way to help manage your Twitch chat? Setting up a chatbot like StreamLabs Cloudbot can be a great solution to help you manage your chat more efficiently. Let’s go through how to set up Streamlabs Cloudbot (hereafter referred to as cloudbot) as a first-time user. In this guide (and linked video), we’ll cover the basics of setting up cloudbot for Twitch and go over some of its features. If you prefer a video guide, check here for my video on the topic.
First things first, you’ll need to go to streamlabs.com and sign up or log in using your Twitch account.

It’s worth mentioning that StreamLabs Cloudbot also works with Youtube and I think Facebook, but we’ll be focusing on Twitch streaming for now. Once you log in, you will land on the dashboard.
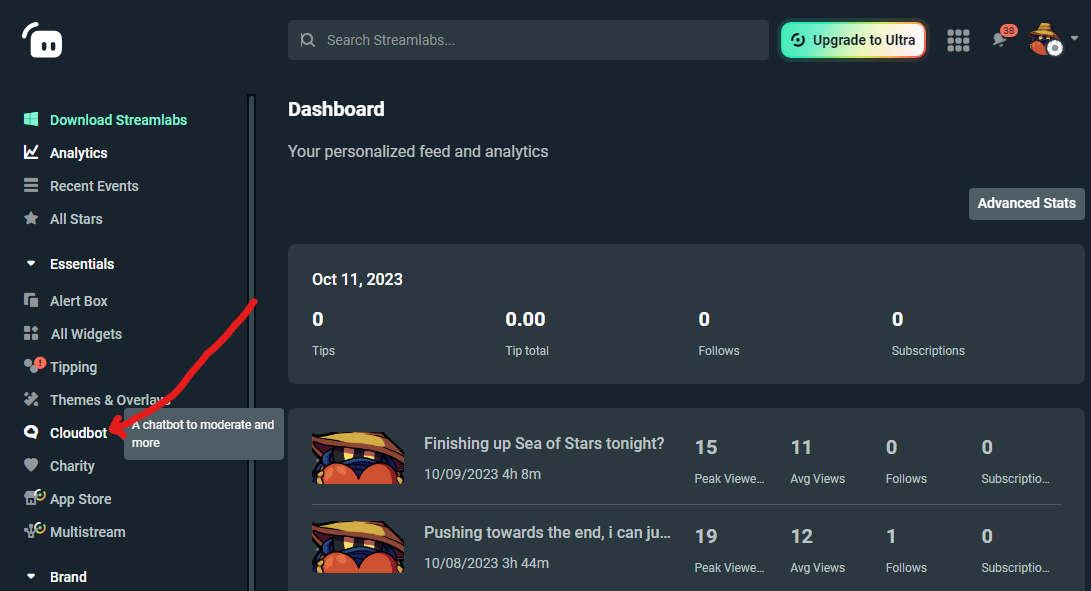
There is a whole ton of stuff here, but we’re going to focus on cloudbot for now, so go ahead and click cloudbot on the left navigation menu.
Getting Cloudbot to Join Channel
The next thing you'll need to do is get the bot to join your channel. This is very easy to do, but also very easy to miss. Right next to cloudbot at the top, toggle the switch to turn StreamLabs Cloudbot on.
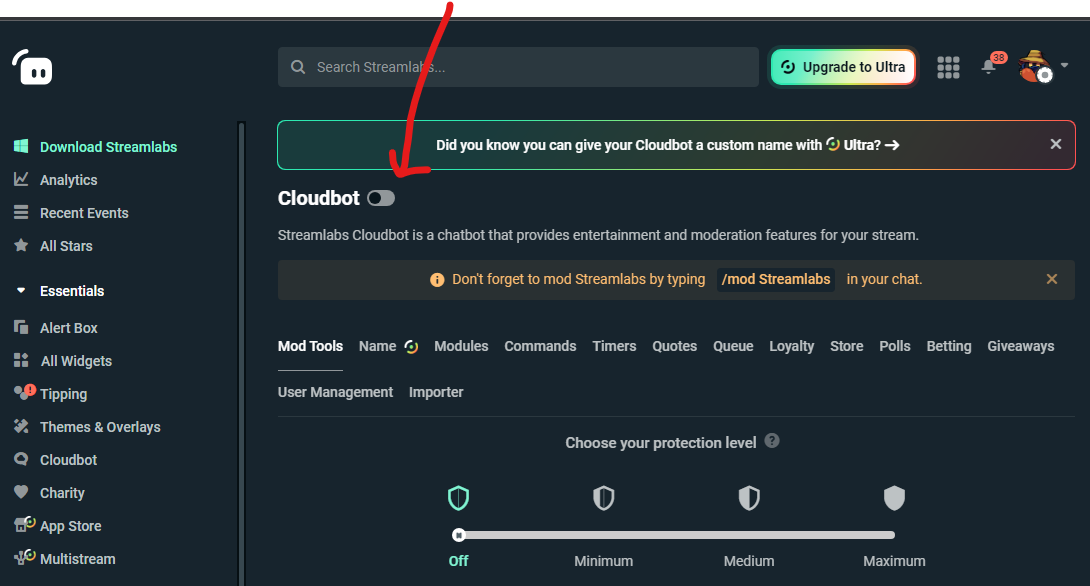
Once the bot has joined your channel, you'll need to grant moderator privileges to cloudbot by typing "/mod streamlabs" in your Twitch chat. If you have already done this, you will receive a confirmation that "Streamlabs is already a moderator." If not, you will receive a message indicating that they have been made one.

Even if you think you’ve already done this step, it doesn’t hurt to do it again just to get that confirmation. In the case that things are not working, this is something that's worth ruling out.
Reviewing StreamLabs Cloudbot Options
Now that that’s working, go back into streamlabs and notice the row of tabs on the cloudbot page.
Each of these will take you to a different set of configuration options for the bot. Let’s go through each of them and pick out some good stuff to turn on (or off).
Notice the first tab labeled Mod Tools. We are going to cover this, but let’s come back to it later.
The second tab, labeled name, has a little icon next to it, which means it’s a premium feature only available with streamlabs ultra.

This will let you use an alternate Twitch account as the bot instead of having everything cloudbot says come from the streamlabs account in chat.
Skip the next tab for now. This is Modules and we’ll come right back to this. Let's first look at turning on the Loyalty system, as most of the modules require it.
Turning on Loyalty Points
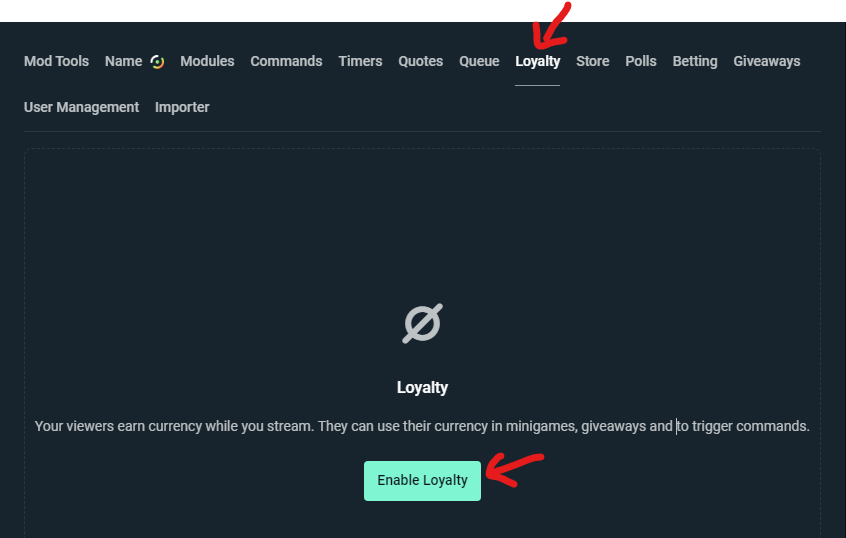
To turn this system on, click the “Enable Loyalty” button.
Under Loyalty, you’ll now have a users tab and a settings tab.
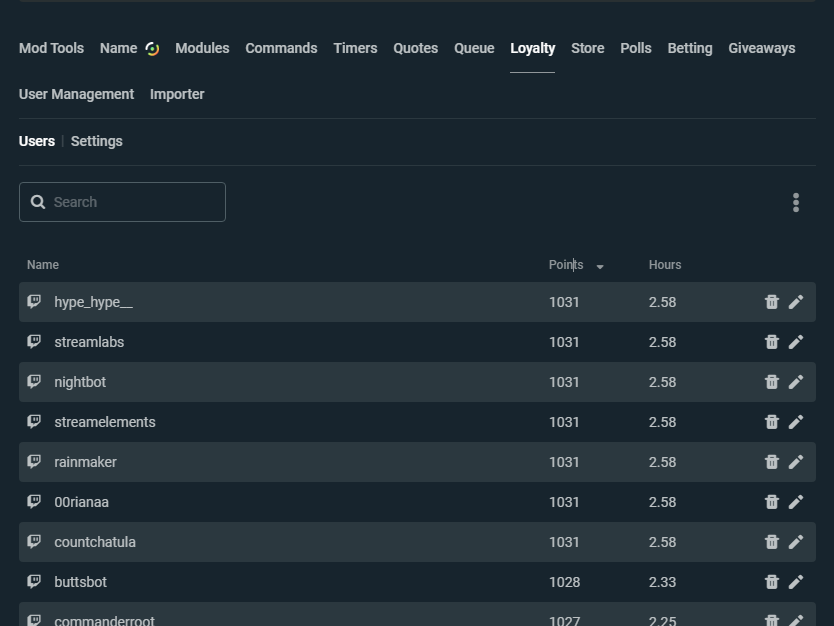
The users tab lets you see the points your users have accrued and their time watched. You can also edit these values for each user.
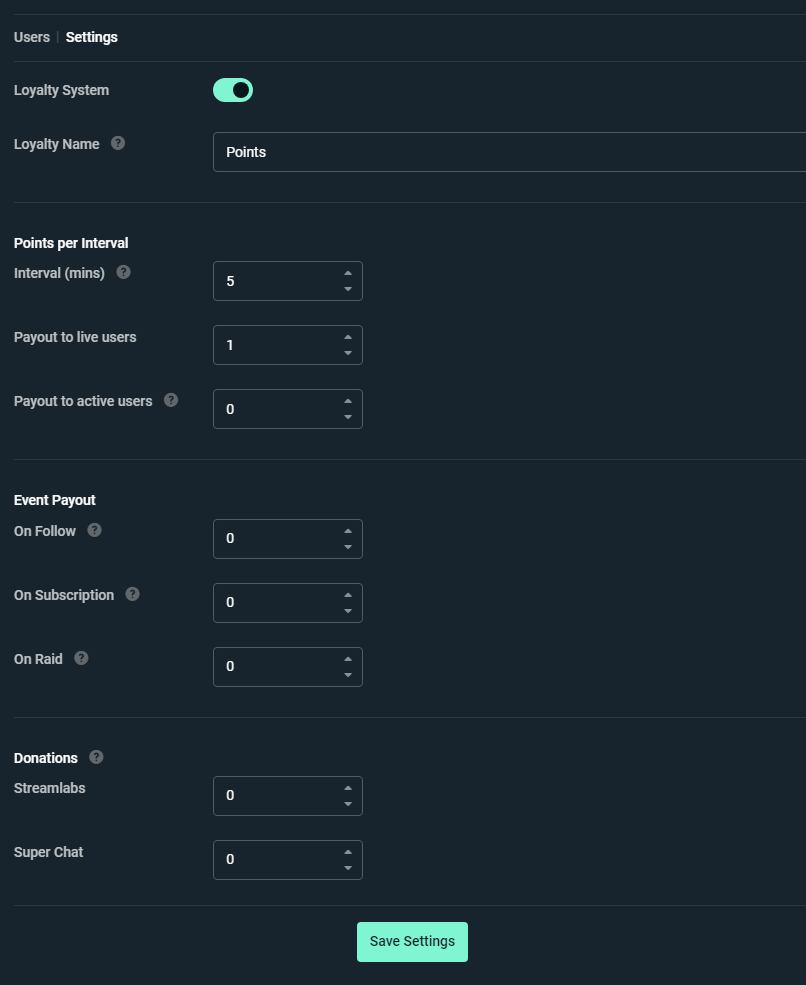
The settings tab is where you can set up how the loyalty points work.
You can rename them from points to anything you want, like dollareydoos, or Gil, or lil’ pumpkins, or whatever.
You can adjust how many points users earn for viewing, how often they accrue, whether they get more points for being active in chat, bonus for follows, subs, raids and donations.
I encourage you to play around with this a bit and figure out how you like things.
Cloudbot Modules
Now that you have points set up, let’s go back to the modules. Most of these require the loyalty points we just set up, but the first group doesn’t and is worth reviewing, especially if this is your only chatbot for Twitch.
The chat alerts module lets you establish some basic chat-based messaging when certain Twitch events happen, like follows, cheers, or subscriptions.
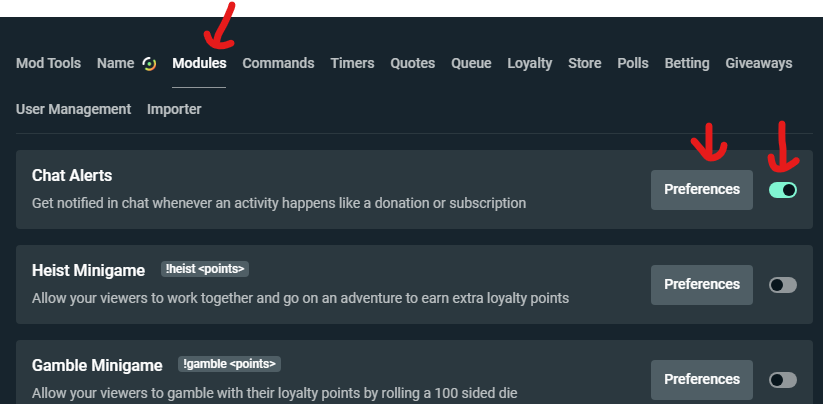
I encourage you to click through these options and set up basic messages for follows, bits, subs, and raids. (I recommend an anonymous "new follower" message that doesn’t call out the user, but that’s a whole separate video topic for another day).
Back in the module list, the rest of the modules are minigames played with loyalty points. There’s gambling, magic 8 ball, slots, and some others.
Feel free to turn on any of these that seem interesting, you can can click preferences to configure them further.
Default Commands
Finally, we arrive at the Commands Tab. When you click commands it goes immediately to your custom commands, but before we go through those, let’s look at the default commands available.
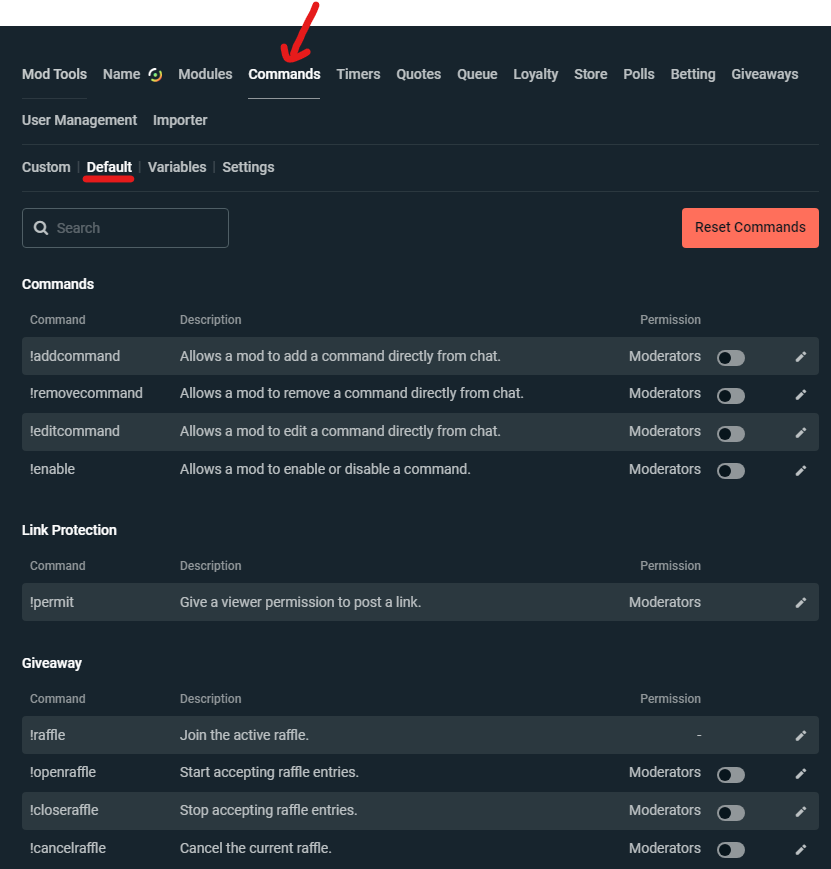
There are some moderation commands that help you and your moderators adjust your custom commands on the fly from chat at the top.
We’ll go into these in a whole separate video sometime.
If you’re using link protection through streamlabs (we’ll look at this in a minute), you can adjust the !permit command here that allows users to post links for a given amount of time.
There are commands for giveaways, for the quotes system that lets your users save and recall quotes, a simple queue system, media share commands, commands to manage the loyalty points system, and other modules.
Under Misc, there are some other good commands that help you and your moderators manage the stream title and category from chat, as well as turn on and off a safe mode.
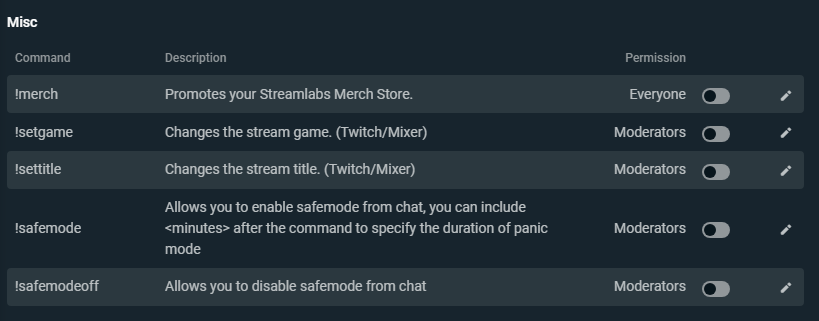
The chat alerts module lets you establish some basic chat-based messaging when certain Twitch events happen, like follows, cheers, or subscriptions. Go ahead and browse these default commands and turn on the ones you think you might want to use.
Custom Commands
Now let’s get into the fun stuff, custom commands. Back at the top of the commands tab, click Custom. Click the add command button to open the form to create a custom command.
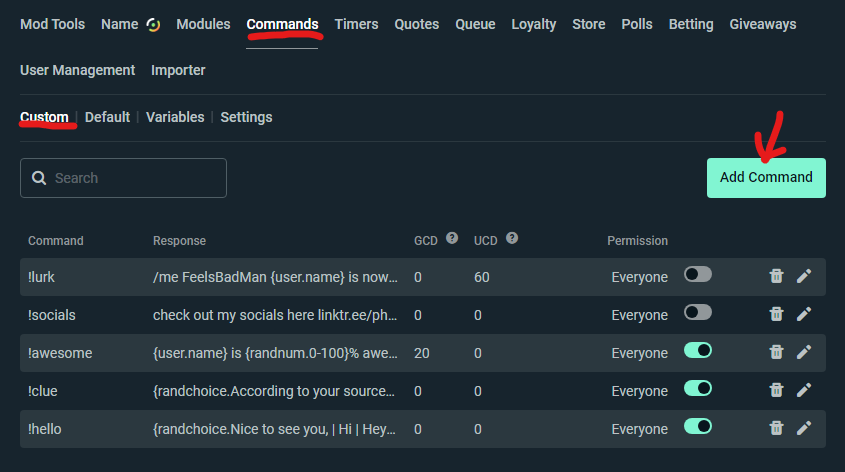
Streamlabs has a great feature here where you can choose a template to start from, and they have a lot of the popular commands built right in here, all you have to do is choose them and save.
I recommend that you look through these, and enable a few of them, but as an example let’s look at the !lurk command.
When you select from the list, it’ll automatically fill in the response box with an appropriate message, many of which have some variables used to make the commands work.
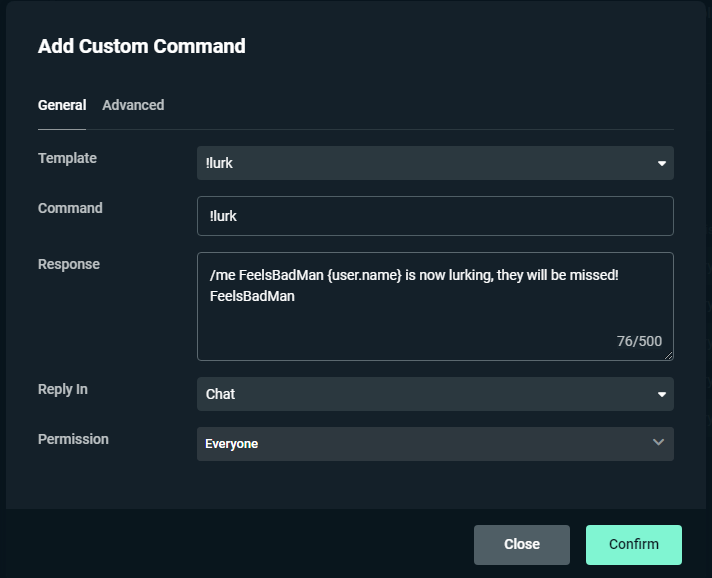
Lurk uses the {user.name} variable to populate the name of the person who typed the command.
You can also specify how this command responds, whether in chat or in a whisper and specify who has permission to use this command.
Advanced Command Settings
The advanced tab has even more options where you can specify cooldowns, loyalty point costs, and aliases for this command.
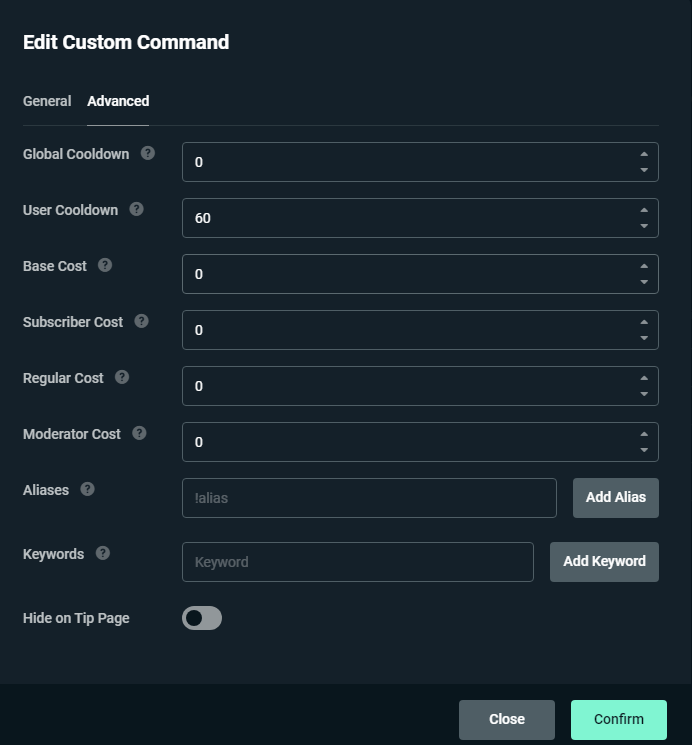
Once you’ve adjusted things how you like (or left them at the defaults) click “Confirm” at the bottom to save the command.
If you’re making your own command from scratch, it’s really the same process, you just don’t select something from the template dropdown, or maybe you select the one that is similar to what you’re trying to do and then modify it.
I’ll be making several videos about how to make very specific commands using this feature, so keep a lookout for those! You can check out the Cloudbot page here to see other guides for StreamLabs Cloudbot.
Timed Chat Messages
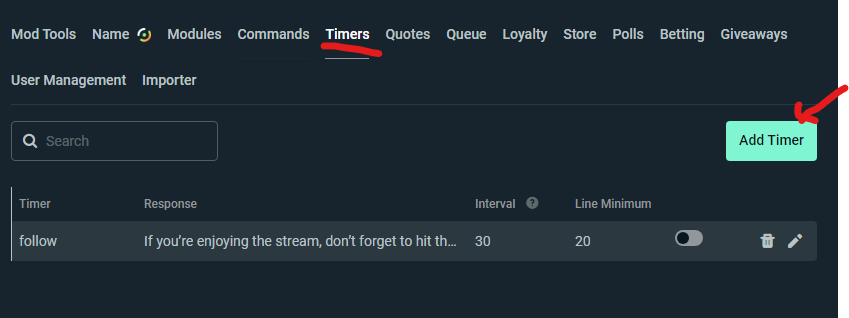
Next, let’s visit the timers tab. Use timed messages to welcome new viewers, remind chat of upcoming events, or even promote social media channels or donation links.
To set one up click the “Add Timer” button here.
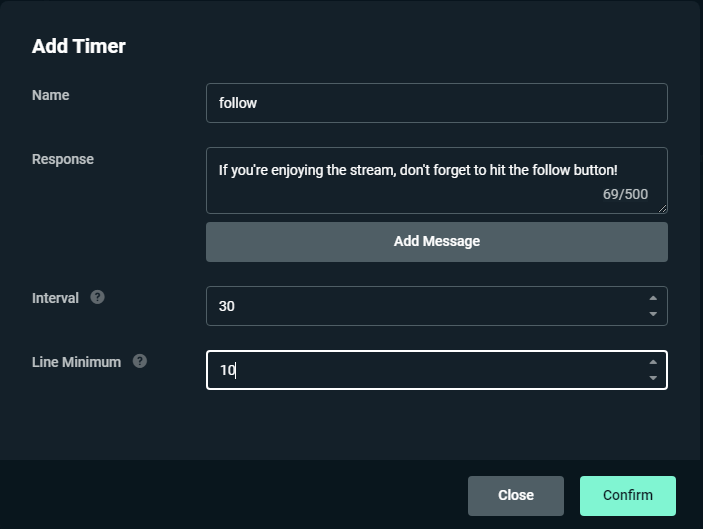
For example purposes, we’ll set up a follow reminder, so in the name box we’ll put “follow”... the name field is just so you know what the timer is for later, users won’t see it. The response field is where you put what you want the bot to post in chat. For now, we’ll just put something like “If you’re enjoying the stream, don’t forget to hit the follow button!” or something like that.
Don't Spam Your Own Chat
Adjust the interval field to set how often this timed message fires. The default is 5 minutes, which is WAY too frequent for most streams.
Timers are great but you have to find the right settings so it’s not just the bot spamming the same thing in chat over and over.
If you have a really active chat, this isn’t as much of a problem, but in a fairly quiet chat, it can get really spammy really fast, so I recommend keeping your timer interval at something like 30 minutes.
The “line minimum” field allows you to prevent the timer from firing even if the appropriate amount of time has passed if there hasn’t been enough other activity in chat. This is a really good way to prevent the bot from just posting the same message again and again with nothing in between. Depending on your chat volume, I recommend setting this to at least 5, if not 10 or 20.
This means that at least 5 lines of chat from users other than the bot have happened since this timer fired last. Press Save at the bottom and your timer is set up.
The next tab in the menu is for the Quotes system, and if you’re using it will populate all the saved quotes here so you can spot-check them and make edits.
You can also add quotes directly here as well.
The Queue system has a tab here as well, and so does the loyalty points store, polls, giveaways, and betting modules, but we’re not going to get into those at the moment, but let me know in the comments if any of these are of particular interest to you and I can do a deep dive.
Link Protection
Ok, now let’s go back to mod tools. While I advise you to peruse these options, I don’t personally find any of them useful except the link protection one. Let’s click on that one and set it up.
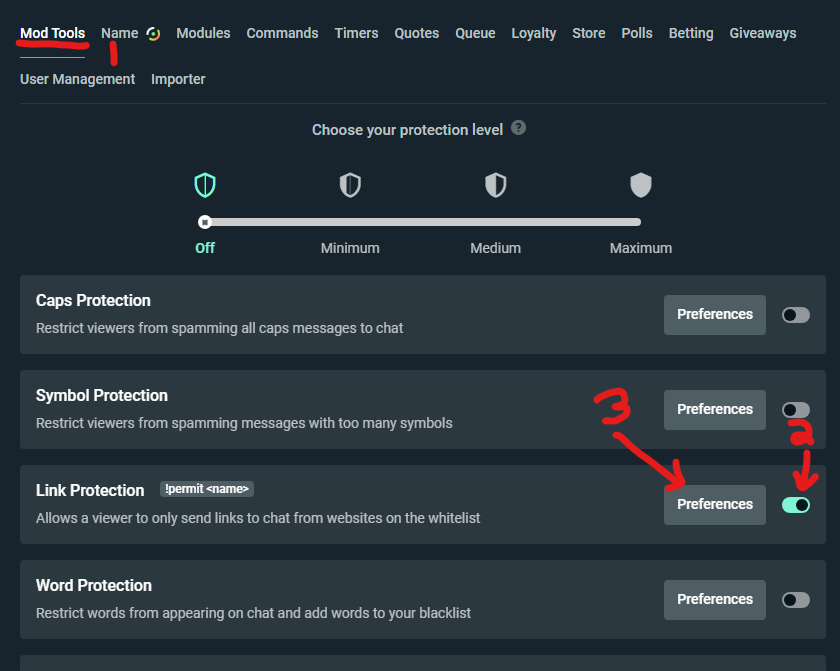
The top box allows you to set user levels who will automatically be permitted to post links, like subscribers or regulars.
Regulars are a group that can be defined within streamlabs, but we’ll get to that later. Generally, I leave this on None.
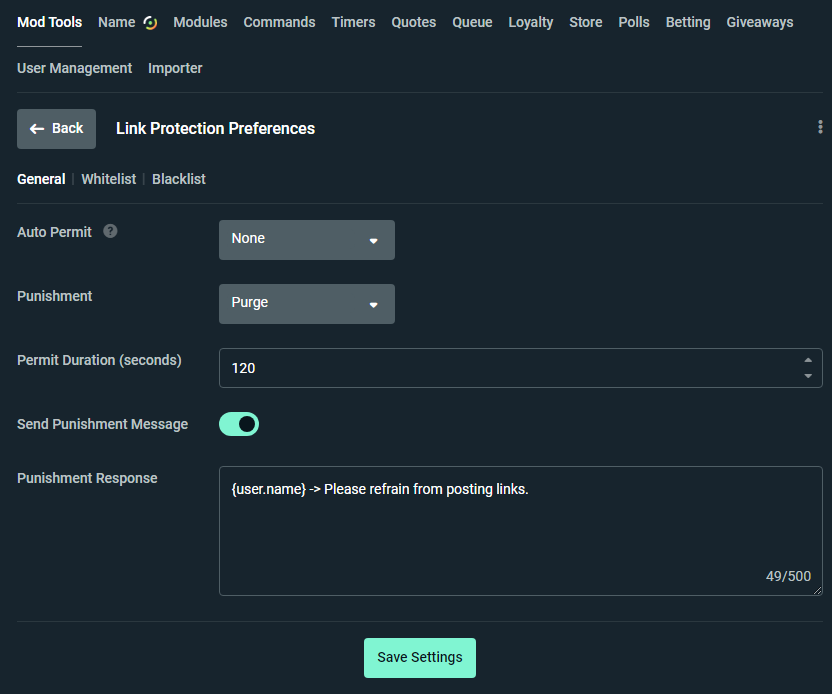
Use the Punishment dropdown to choose how violations of this rule are handled. Purge will delete the users’ recent messages and apply a 1-second timeout.
Timeout will purge the messages and also prevent the user from chatting for a specified amount of time, and Ban will purge the messages and ban the user.
I recommend either purge or timeout with a very short timeout time.
The permit duration is how long a user is allowed to post links that would otherwise violate this rule when you use the !permit command. We’ll revisit that command in a bit.
You also have the option here to configure the message that gets sent when someone breaks this rule (or turn off the punishment message entirely)
Additional Options for Link Protection
At the top of this form, you’ll see tabs for General, whitelist, and blacklist. Whitelist lets you set up a list of domains that are always allowed.
Blacklist allows you to set up a list of domains that are never allowed, even if the user is otherwise allowed to post links.
Mods can still do whatever they want though, but if your mods are posting links that you disagree with then you have bigger problems.
One thing to note, depending on how you have your Twitch link settings set up, links may still be blocked even if the user is given permissions with !permit.
We’ll go into the native Twitch auto-mod settings in another video, but since we’re already talking about this, let’s take a look at where this setting is in Twitch real quick.
In your Creator Dashboard, go to Settings and Moderation. In the Second section labeled “chat options,” there is a “ban hyperlinks” toggle.
If you want cloudbot to have more control of link moderation, simply leave this toggle off in Twitch.
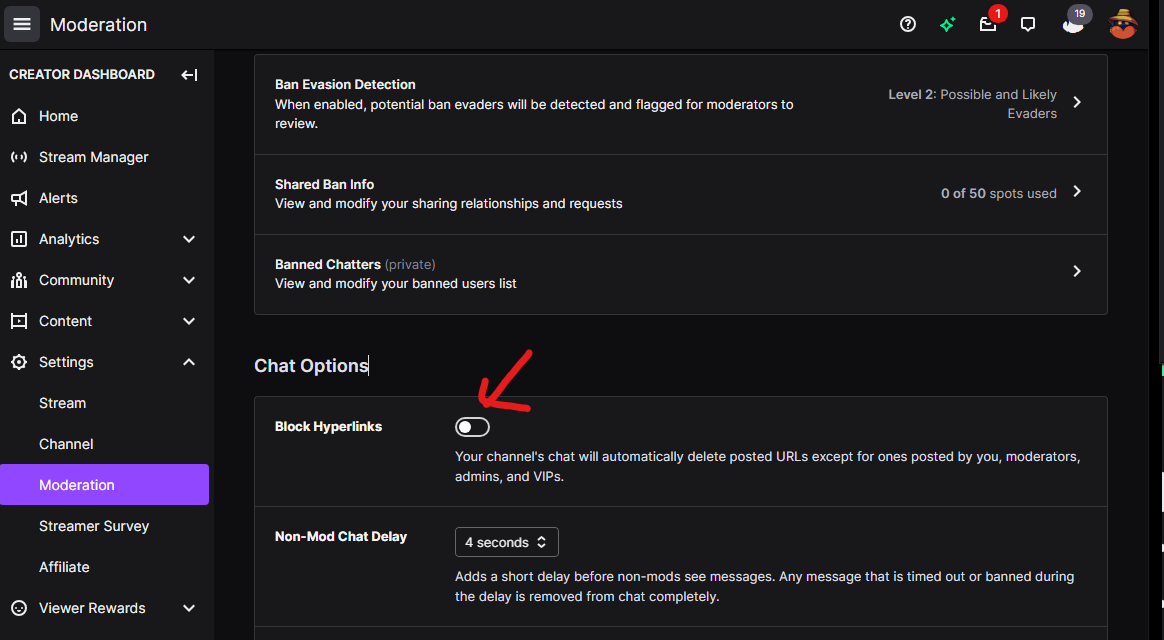
I recommend familiarizing yourself with the rest of the Twitch auto mod settings as well, as they are getting quite comprehensive and can now do most of what people used to have to rely on bots like streamelements for.
Word Protection Options
Back in cloudbot, let’s take a quick look at the word protection options. Click the Mod Tools tab and then click Word Protection.
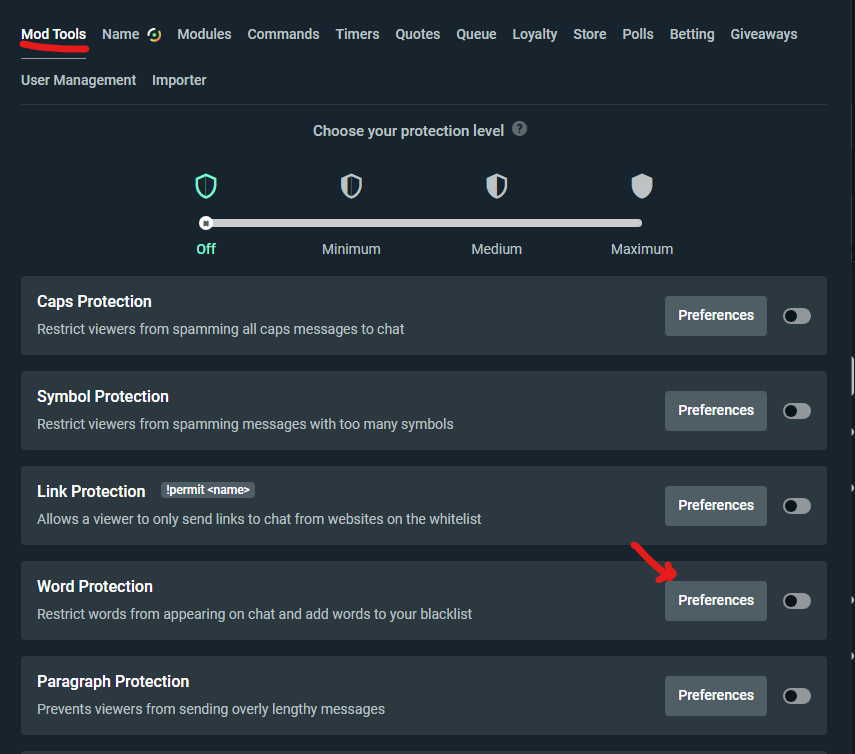
This allows you to do word-based moderation in your chat, but honestly, you’re probably best off doing this natively within Twitch at this point, if you want to have cloudbot handle it, you can view the options here.
There are a few toggles -
One is to use the “default blacklist”. Who knows what is on there, but it’s probably a pretty decent generic option if you want a “set it and forget it” kind of approach.
The “scan usernames” toggle makes the same set of blacklist rules apply for usernames in chat as well.
To set up a custom blacklist (either instead of or in addition to the default list that streamlabs provides), click the blacklist tab, then the add word/phrase button.
/heading
For each word/phrase that you enter, you can choose the word detected, the punishment level, and whether or not the word uses a regex expression – which you’re welcome to ask me about in the comments if you have an idea for some fancy blacklist rule.
Now, we’ve explored the dashboard, have StreamLabs Cloudbot set up, some simple commands for both viewers and moderators to use, a few basic moderation tools, timed messages, a giveaway tool, and the know-how needed to make new custom commands.